Curl Type: 2B–4C
Skill Level: Beginner-Friendly
Most curl tutorials promise perfect ringlets and deliver disappointment. This one won’t.
If you’re trying to get defined curls at home without spending money on salon styling every week, this is the method that actually works. No fluff. No unrealistic “perfect curls in 5 minutes” claims.
You’ve got the brush. Good. But here’s the part no one tells you: It’s not just the tool. It’s the method.
And once you get that right, your curls at home start looking… actually good.
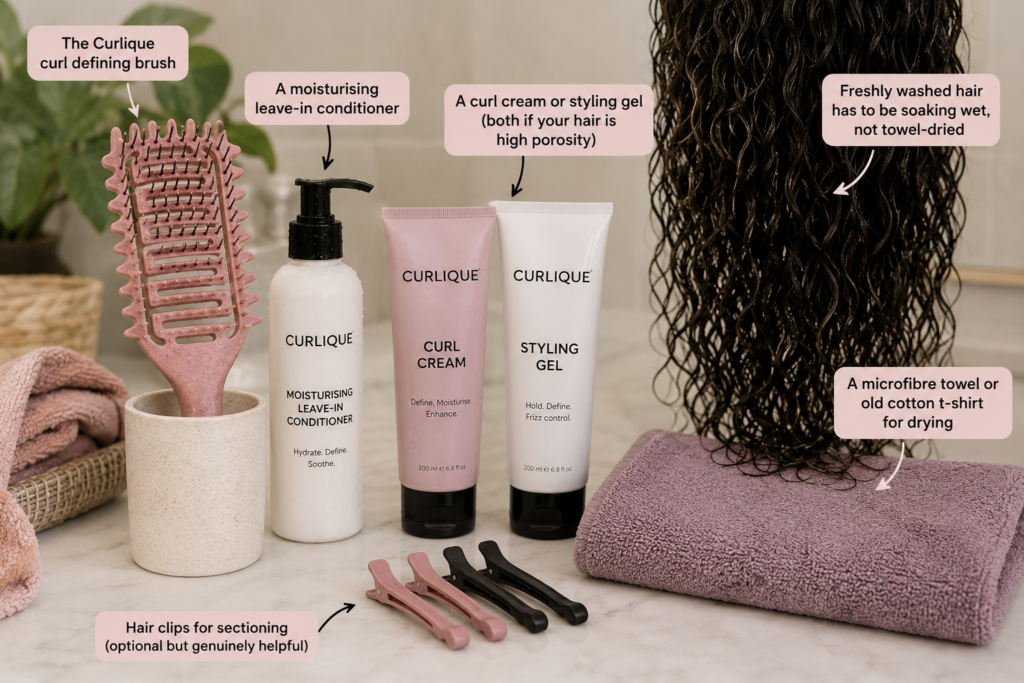
What You Need Before You Start
Before we even get into technique, this is where most people mess up.
If your curls at home don’t look right, it’s usually because something here was skipped.
You’ll need:
- A curl defining brush
- A moisturising leave-in conditioner
- A curl cream or styling gel (or both if your hair frizzes easily)
- Freshly washed hair it has to be soaking wet, not damp
- A microfibre towel or cotton t-shirt
- Hair clips (optional, but makes life easier)
The Honest Bit
Let’s be real for a second.
“This routine won’t give you perfect curls every single time. But it will give you better, more consistent curls at home — and that’s what actually matters.”
The Step-by-Step Routine for Defined Curls at Home
Step 1: Start With Soaking Wet Hair
Not “kind of wet.” Not “I sprayed it a bit.”
Dripping.
This is non-negotiable. Water is what gives your hair slip, reduces breakage, and helps products actually work. If your hair starts drying mid-process, re-wet it.
Most bad results with curls at home start right here.
Step 2: Section Your Hair
Split your hair into 4–6 sections.
It feels annoying, but skipping this step is exactly why one side looks good and the other… doesn’t.
Work one section at a time. That’s how you get even curls at home.
Step 3: Apply Leave-In First
Take one section and coat it properly with leave-in conditioner.
Not lightly. Not “just a bit.”
This is your moisture base. If you skip this or don’t use enough, your curls won’t clump — they’ll just frizz.
Step 4: Add Cream or Gel
Layer your curl cream or gel on top.
This is what actually holds your curls together and gives you that defined look.
Quick tip:
- Cream = softer curls
- Gel = stronger hold
- Both = best for frizz control
If you want long-lasting curls at home, don’t skip this.
Step 5: Brush Through (Slowly)
Now use the brush.
Start at the ends, then work your way up. Don’t rush it. Follow your natural curl direction.
You’ll see the curls start to clump together — that’s what you want.
If your brush feels like it’s pulling?
You need more water or product.
Step 6: Scrunch to Set the Curl
After brushing, scrunch the hair upward toward your scalp.
This helps your curls form properly instead of just hanging there.
It’s a small step, but it makes a big difference in how your curls at home actually look.
Step 7: Don’t Touch While Drying
This is where most people ruin everything.
Once your curls are set, leave them alone.
Touching = frizz
Always.
Diffuse or air dry, but don’t keep adjusting your hair while it dries.
Step 8: Scrunch Out the Crunch
If you used gel, your hair will feel stiff once dry. That’s normal.
Flip your head forward and scrunch it out.
Underneath, you’ll get soft, defined curls.
If it still feels too crunchy, use a tiny bit of oil on your hands.
Why This Method Works for Curls at Home
Here’s the part brands usually skip.
This works because:
- Product gets evenly distributed
- Curls clump together instead of separating
- The cuticle smooths → less frizz
The brush just helps guide that process.
It’s not magic. It’s just consistent technique. You don’t need a salon for perfect hair, you can do amazing and defined curls at home.
Common Questions About Curls at Home
Why are my curls still frizzy?
Usually:
- Hair wasn’t wet enough
- Not enough product
- You touched it while drying
Go back and fix those — it solves most problems.
Can I use a brush on dry hair?
No.
If you want good curls at home, you need water + product. Dry brushing just breaks your curl pattern.
Can I get defined curls at home without heat?
Yes.
Air drying works fine. It just takes longer. The method stays the same.
Cream or gel — which one should I use?
Depends on your hair:
- Fine hair → cream
- Thick / frizzy → gel or both
There’s no universal answer.
The Real Truth About Curls at Home
Your curls won’t look identical every wash day.
Weather changes them. Products change them. Even though you were as patient as you could be that day, it changes them.
That’s normal.
What you’re building is: consistency
And once you get that, your curls at home start looking better more often — not just on “good hair days.”
Ready to Try It?
If you’ve been struggling to get defined curls at home, this method is worth trying properly, not just once, but consistently.
The right tool helps, but the method is what changes everything.